
Crispy Cone Snack/ Fried Crispy Cone
Crispy Cone stuffed with spicy or sweet filling is a perfect tea time snack for hungry kids. Crunchy, golden brown cones are easy to prepare and can be prepared earlier and stored in airtight containers. You can fill it with sweet or spicy filling of your choice. Here, I have used spicy Chinese style filling to stuff the Crispy Cone. It is a great snack idea for those who like the crunchy bites. All you need are some tin-plated steel cones or stainless-steel cones that are available in market. You get it online as well. All thanks to darling Beenchi, who taught me to prepare this fantastic snack!
I am a great fan of crunchy snacks from childhood. Apart from fried chips,Masala peanuts and Murukku, I love the crispy Samosas, Spinach Pakoras, vegetable samosas, Paneer Fingers, Spring rolls, Banana fritters, Calamari fritters, Chicken Popcorn and even cutlets. Sometimes, I make Masala Vada so thin to make it completely crispy. 😊 Pakodas, Uzhunnu Vada, Potato croquettes, crunchy Egg Puff, are all in my favourite Crunchy snack list.
For the stuffing, sometimes I mix Corn, onions, tomatoes, cucumber, coriander leaves with a hint of chat masala to get Chatpata Corn chaat in a Cone. You can have any vegetables or chicken mix or any sweet mixture to fill the Crispy cone. This is a great idea for parties as cone can be prepared/ fried in advance and stuffed with fillings just before serving. So, here is the crispy cone recipe with spicy vegetable filling. Enjoy!
Ingredients for Cone:
| Flour/ Maida | : 1 cup |
| Salt | : 2 pinches |
| Water as required | : 1 large |
| Oil | : 1 tsp |
Ingredients for vegetable filling:
| Beans (French Beans) | : ¼ cup |
| Carrot | : ¼ cup |
| Cabbage and Onion | : ¼ cup |
| Spring Onion chopped | : little |
| Red Chilli sauce | : 1 ½ tsp |
| Soy Sauce | : 1 tsp |
| Pepper Powder | : a pinch |
| Salt | : a pinch |
| Fried Noodles (optional) | : little |
Method:
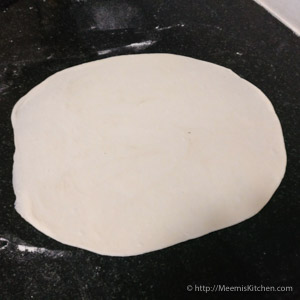
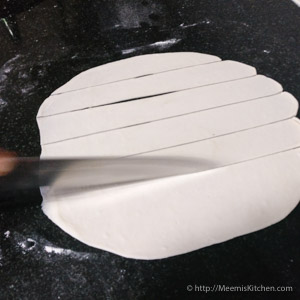
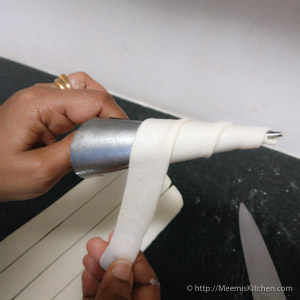
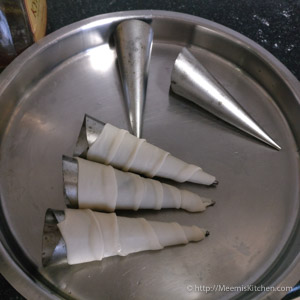
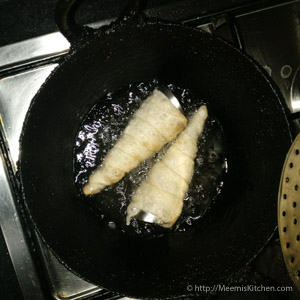
Mix the flour and salt and add water little by little to make a sticky dough. Add the oil and work into a smooth dough. Cover and keep aside for 20 -30 minutes. Divide into 5 parts and make balls. Take one part and flatten the dough into thin roti. With a knife or pizza cutter cut the flattened dough into small ribbons or strips. Grease all the cones (you can buy these stainless-steel cones/ Tin plated cones from Baker’s shop) with little oil. Starting from the bottom edge part, start wrapping the cones with the strips as shown in pics. If you need more strips use and trim off excess ribbon after covering the cone. Wrap and keep the cones ready. Heat oil in a kadai and put the cones into hot oil. Turn and fry till golden brown. Drain the cones to a paper towel. At this point the steel cone can be removed. Use a clean towel to hold the steel cone while you get the crispy cone out. Finish all the cones in the same way. This can be stored in airtight containers to retain the crispiness.

Heat oil in a pan and add thinly cut beans and carrot. After frying for a minute, add Onions and Cabbage and sauté again. Lastly add chopped spring onion, Red Chilli sauce, enough salt and soy sauce. Mix well and keep aside.


Fill the fried cones with the stuffing along with little fried noodles if you need more crunch. Serve immediately.
Tips:
- You can fill any stuffing of your choice in the fried cone.
- Stainless steel cones or tin-plated steel cones are available in Baker’s shop or supermarkets.
- If you have a set of 12 cones, it would be helpful, to save time.
- These crispy cones can be made in advance and stored in airtight containers.
- Crispy cone is a great snack for kid’s parties or get togethers.
- When you wrap the steel cones, leave a little space at the top so you can hold and separate the fried cones easily.
Please try and let me know if you like these Crispy fried cones by commenting below or share with your friends using the share buttons on the side. It would certainly encourage me. Keep visiting meemiskitchen for more great recipes. God Bless!!


Sharing is Caring!
Share this recipe with your friends!